Spring Framework
Table of Contents
- 1. 简介
- 2. Spring 的技术点和优点
- 3. IoC (Inversion of Control)
- 4. 创建 Spring 项目
- 5. 容器 Container 和 Bean
- 6. 资源 Resource
- 7. 面向切面编程 AOP
- 8. 事务
@Transactional - 9. 测试
- 10. Spring MVC
- 11. HTTP 请求映射
- 12. 响应函数参数和返回值
- 13. 跨越 CORS
@CrossOrigin - 14. MVC 配置
@EnableWebMvc - 15. 异步请求
- 16. 远端过程调用
- 17. 客户端请求 RestTemplate
- 18. 发送邮件 Email
- 19. 执行任务和任务调度
- 20. 缓存 Cache
- 21. 参考链接
1 简介
Spring Framework 是一个开源框架,是为了解决企业应用程序开发复杂性而创建的。框 架的主要优势之一就是其分层架构,分层架构允许您选择使用哪一个组件,同时为 J2EE 应用程序开发提供集成的框架。
2 Spring 的技术点和优点
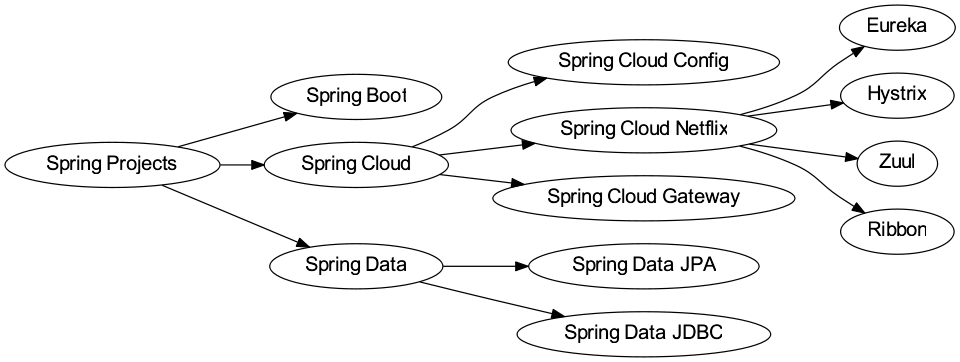
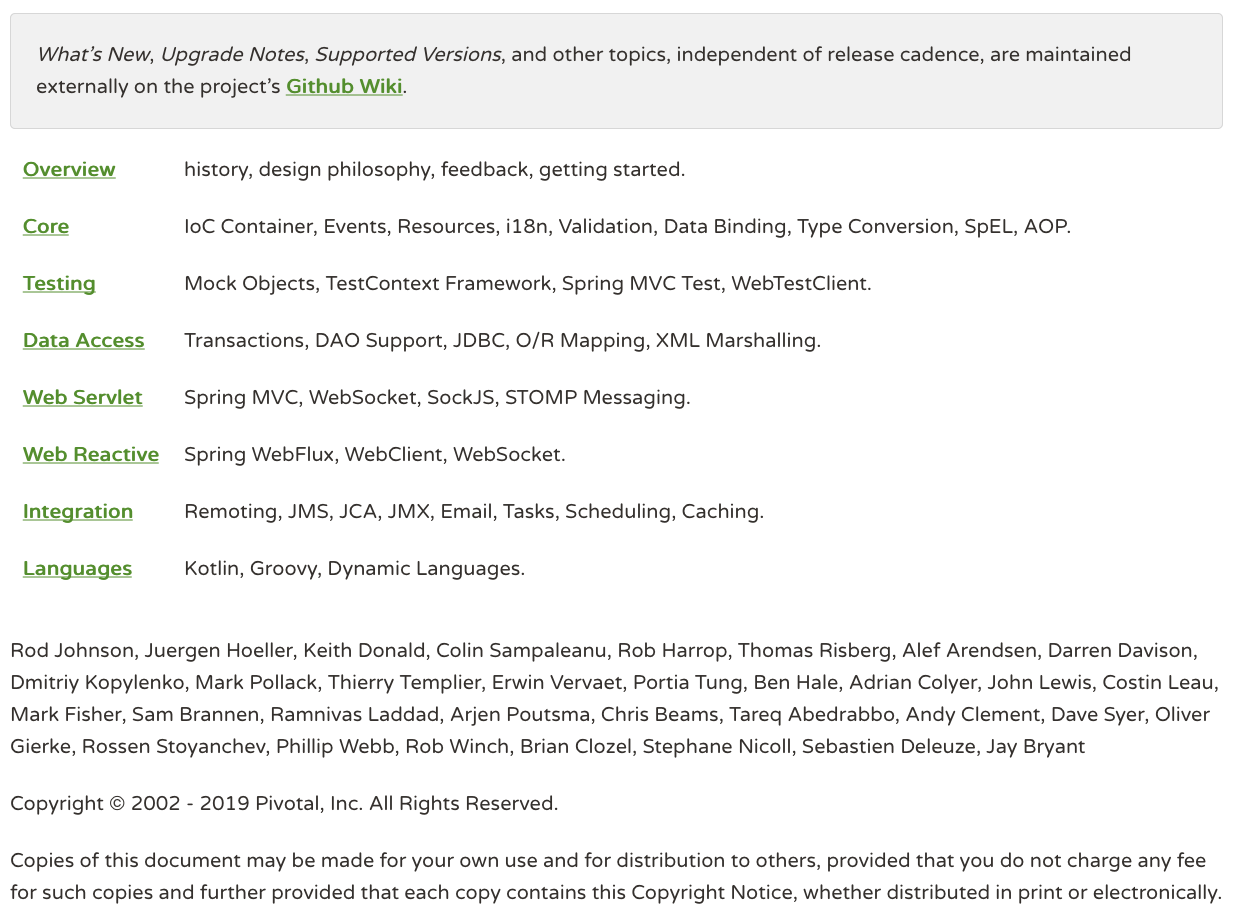
作为 Java Web 开发的龙头老大, Spring 的优点是不需要打广告了,Spring Framework 官网上给出了一下技术要点
- 核心技术:依赖注入,事件,资源,i18n,验证,数据绑定,类型转换,SpEL,AOP
- 测试:模拟对象,TestContext 框架,Spring MVC 测试,WebTestClient
- 数据访问:事务,DAO 支持,JDBC,ORM,编组 XML
- Spring MVC 和 SpringWebFlux Web 框架
- 整合:远程处理,JMS,JCA,JMX,电子邮件,任务,调度,缓存
- 语言:Kotlin,Groovy,动态语言
Spring 的技术点很多,被很多人在工作中应用。这显然是离不开 Spring 团队优秀的设 计,以下是 Spring Framework 的几个比较突出的优点:
- 轻量级:Spring 在大小和透明性方面绝对属于轻量级的,基础版本的 Spring 框架 大约只有 2MB
- 控制反转(IoC):Spring 使用控制反转技术实现了松耦合。依赖被注入到对象,而不 是创建或寻找依赖对象
- 面向切面编程(AOP): Spring 支持面向切面编程,同时把应用的业务逻辑与系统的 服务分离开来
- 容器:Spring 包含并管理应用程序对象的配置及生命周期
- MVC 框架:Spring 的 Web 框架是一个设计优良的 Web MVC 框架,很好的取代了一 些 Web 框架
- 事务管理:Spring 对下至本地业务上至全局业务(JAT)提供了统一的事务管理接口
- 异常处理:Spring 提供一个方便的 API 将特定技术的异常(由 JDBC, Hibernate,或 JDO 抛出)转化为一致的、Unchecked 异常
3 IoC (Inversion of Control)
- IoC 也被称为 DI (dependency injection),是实现 bean 的依赖关系,即在初始化 一个 IoC 容器时,先将其依赖的容器一并初始化,并注入的新的容器中。
- IoC 的好处是可以自动管理 Java 类的示例,提升开发速度
- Spring 管类的实例叫 Bean,Spring 提供了一系列方法来管理 Bean,其中包括:
- BeanFactory Bean 的工厂,ApplicationContext 应用运行的上下文。注意: ApplicationContext 和 BeanFactory 都能实例化 Bean,但是一般尽量使用 ApplicationContext,因为 ApplicationContext 还额外提供了一些其他功能,如: 继承生命周期管理,BeanPostProcessor 自动注册,BeanFactoryPostProcessor 等
- 还有一些 XML 配置类的解析,XML 配置相当于 Spring 构建 Bean 的蓝图,早期 Spring 都用 XML 来配置类,但是由于太复杂,现在已经被 Java 的注解所代替
4 创建 Spring 项目
创建一个 Maven 项目项目工程
mvn archetype:generate \
    -DarchetypeArtifactId=maven-archetype-quickstart \
    -DinteractiveMode=false -DgroupId=io.github.jeanhwea -DartifactId=mapp
添加 spring-context 的项目依赖到 pom.xml 文件中
<dependency>
  <groupId>org.springframework</groupId>
  <artifactId>spring-context</artifactId>
  <version>5.2.4.RELEASE</version>
</dependency>
使用命令行的方式运行主类
mvn exec:java -Dexec.mainClass="io.github.jeanhwea.App" -Dexec.classpathScope=runtime
5 容器 Container 和 Bean
Spring Framework 提供了管理 Bean 的接口 ApplicationContext,也就是说 Bean 的 初始化都是在 ApplicationContext 的实现中处理的,比如: ClassPathXmlApplicationContext 和 FileSystemXmlApplicationContext 都对 ApplicationContext 进行实现,这些 ApplicationContext 是装在 Bean 的,所以被称 为容器。
Bean 其实是一种 Java 的对象,在 Spring 中,Bean 除了普通定义的 Java 代码以外,
还需要一些其他的元信息,例如:定义的 XML,或者 @Component 注解。所以 Spring
中的对象和普通 Java 对象是不一样的,为了体现 Spring 的高贵性,就将 Spring 中
的对象称为 Bean。Bean 的 XML 配置非常恶心且繁琐,不需要记的,用的时候去官网上
查就行。
关于 Bean 的使用需要掌握以下几个要点
- Bean Class, Name, Alias, Constructor arguments, Properties
- Bean Scope: singlenton, prototype, request, session, application, websocket
- Reference:
ref/refid - Collections
<list/>,<set/>,<map/> - Autowiring:
no,byName,byType, constructor *AwareInterfaces: ApplicationContextAware, ResourceLoaderAware, BeanFactoryAware- Bean Definition Inheritance:
<parent/> - Lazy initialization mode
- Initialization method
- Initialization/Destruction method
- Annotation:
@Required,@Autowired
6 资源 Resource
Spring 秉承着一切皆资源,将可以被访问的东西都囊括在 Resource 接口中。并提供了
以下一些实现,用户可以直接通过 URL 来获取: classpath:config.xml,
file:///data/config.xml, http://myservice/logo.png, /path/to/file.txt
- UrlResource
- ClassPathResource
- FileSystemResource
- ServletContextResource
- InputStreamResource
- ByteArrayResource
7 面向切面编程 AOP
AOP 框架创建的对象,代理就是目标对象的加强。Spring 中的 AOP 代理可以使 JDK 动态代理, 也可以是 CGLIB 代理,前者基于接口,后者基于子类。
- Aspect 通常是一个类,里面可以定义切入点和通知
- Join Point 程序执行过程中明确的点,一般是方法的调用
- Advice 在特定的切入点上执行的增强处理
- Pointcut 带有通知的连接点,在程序中主要体现为书写切入点表达式
package com.xyz.someapp;

import org.aspectj.lang.annotation.Aspect;
import org.aspectj.lang.annotation.Pointcut;

@Aspect
public class SystemArchitecture {

    /
     * A join point is in the web layer if the method is defined
     * in a type in the com.xyz.someapp.web package or any sub-package
     * under that.
     /
    @Pointcut("within(com.xyz.someapp.web..)")
    public void inWebLayer() {}

    /
     * A join point is in the service layer if the method is defined
     * in a type in the com.xyz.someapp.service package or any sub-package
     * under that.
     /
    @Pointcut("within(com.xyz.someapp.service..)")
    public void inServiceLayer() {}

    /
     * A join point is in the data access layer if the method is defined
     * in a type in the com.xyz.someapp.dao package or any sub-package
     * under that.
     /
    @Pointcut("within(com.xyz.someapp.dao..)")
    public void inDataAccessLayer() {}

    /
     * A business service is the execution of any method defined on a service
     * interface. This definition assumes that interfaces are placed in the
     * "service" package, and that implementation types are in sub-packages.
     *
     * If you group service interfaces by functional area (for example,
     * in packages com.xyz.someapp.abc.service and com.xyz.someapp.def.service) then
     * the pointcut expression "execution(* com.xyz.someapp..service..(..))"
     * could be used instead.
     *
     * Alternatively, you can write the expression using the 'bean'
     * PCD, like so "bean(Service)". (This assumes that you have
     * named your Spring service beans in a consistent fashion.)
     */
    @Pointcut("execution( com.xyz.someapp..service..(..))")
    public void businessService() {}

    /*
     * A data access operation is the execution of any method defined on a
     * dao interface. This definition assumes that interfaces are placed in the
     * "dao" package, and that implementation types are in sub-packages.
     */
    @Pointcut("execution( com.xyz.someapp.dao..(..))")
    public void dataAccessOperation() {}

}
8 事务 @Transactional
8.1 @Transactional
事务不仅仅是 Spring 特有的特性,在数据库并发中普遍存在,具体事务的特性我在
Oracle 中事务一节中有详细地讨论,这里着重记录 Spring 中 @Transactional 标注的使
用
在 Spring 中,事务使用操作的相关讨论出现在 Data Access 一节中,
@Transactional 开启一个事务,例如下面的 FooService 开启了事务管理,虽然
Spring 也支持 XML 方式配置事务,但是比较麻烦,尽量避免使用
@Transactional
public class DefaultFooService implements FooService {

  Foo getFoo(String fooName) { /* ... */ }
  Foo getFoo(String fooName, String barName) { /* ... */ }
  void insertFoo(Foo foo) { /* ... */ }
  void updateFoo(Foo foo) { /* ... */ }

}
事务显然有很多属性可以配置,例如:是否只读,是否传播,隔离级别,超时的时长, 以及为何中异常回滚,因为属性多,所以需移步官网文档 Transactional Settings
@Transactional(readOnly = true)
public class DefaultFooService implements FooService {
  public Foo getFoo(String fooName) { /* ... */ }

  // these settings have precedence for this method
  @Transactional(readOnly = false, propagation = Propagation.REQUIRES_NEW)
  public void updateFoo(Foo foo) { /* ... */ }
}
在 Spring 中,事务包含一个传播方式,大体上有如下几种:
PROPAGATION_REQUIRED所有方法串在一个事务中执行PROPAGATION_REQUIRES_NEW每次进入子方法时,新开一个事务PROPAGATION_NESTED所有方法串在一个事务中,但是进入子方法时记录保存点 (Save Point)
Spring 也支持多事务管理员角色的注解,使用方法参考下面例子
public class TransactionalService {

  @Transactional("order")
  public void setSomething(String name) { /* ... */ }

  @Transactional("account")
  public void doSomething() { /* ... */ }
}
也可以自己定制的方式定义属于业务逻辑的事务管理注解,参考如下的例子
@Target({ElementType.METHOD, ElementType.TYPE})
@Retention(RetentionPolicy.RUNTIME)
@Transactional("order")
public @interface OrderTx {
}

@Target({ElementType.METHOD, ElementType.TYPE})
@Retention(RetentionPolicy.RUNTIME)
@Transactional("account")
public @interface AccountTx {
}
public class TransactionalService {
  @OrderTx
  public void setSomething(String name) { /* ... */ }
  @AccountTx
  public void doSomething() { /* ... */ }
}
8.2 TransactionTemplate
Spring 实现了 TransactionTemplate 模版类,也可以很方便的操纵事务相关的业务
public class SimpleService implements Service {

  // single TransactionTemplate shared amongst all methods in this instance
  private final TransactionTemplate transactionTemplate;

  // use constructor-injection to supply the PlatformTransactionManager
  public SimpleService(PlatformTransactionManager transactionManager) {
    this.transactionTemplate = new TransactionTemplate(transactionManager);
  }

  public Object someServiceMethod() {
    return transactionTemplate.execute(new TransactionCallback() {
        // the code in this method executes in a transactional context
        public Object doInTransaction(TransactionStatus status) {
          updateOperation1();
          return resultOfUpdateOperation2();
        }
      });
  }
}
9 测试
Spring 框架的一个特色就是提供测试 Spring Testing 的功能,对于日常工作测试,主
要了解 @Transactional, @Rollback 以及 @Commit 这样三个注解功能。Spring
测试时默认开启事务,如果测试中修改或删除了数据,在测试后要求修改回来。
10 Spring MVC
10.1 简介
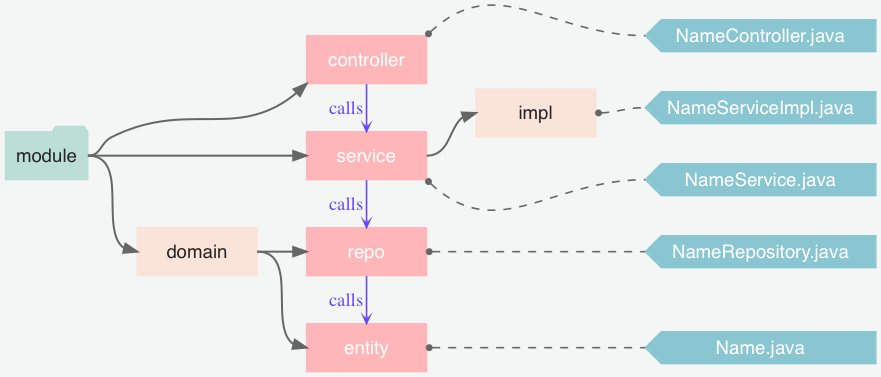
Spring MVC 是 Spring Web MVC 通用叫法,由于 spring-webmvc 包的缘故,之前才被
称为 Spring Web MVC。 他提供了开发 MVC 页面的框架,它期初是建立在 Servlet API 基
础上。 我一般讲 Spring MVC 项目组织成如下结构:
10.2 核心组件
Spring MVC 是对通用 Servlet 的一个代理,其实现的 DispatcherServlet 提供对请 求预处理的共享算法。WebApplicationContext 是 ApplicationContext 的子类,他除 了继承 Spring 的 IoC 功能以外,提供了许多对 Web 操作的功能。
10.3 Servlet 配置
Spring MVC 提供了配置 Servlet 的方法。实现 WebApplicationinitializer 接口的 类都可以在 Web 应用程序启动时被加载。具体操作如下:
import org.springframework.web.WebApplicationInitializer;
public class MyWebApplicationInitializer implements WebApplicationInitializer {
  @Override
  public void onStartup(ServletContext container) {
    XmlWebApplicationContext appContext = new XmlWebApplicationContext();
    appContext.setConfigLocation("/WEB-INF/spring/dispatcher-config.xml");

    ServletRegistration.Dynamic registration =
      container.addServlet("dispatcher", new DispatcherServlet(appContext));
    registration.setLoadOnStartup(1);
    registration.addMapping("/");
  }
}
10.4 控制器
Spring MVC 默认使用 @Controller 来表示控制器,如果后台开发的大部分返回
Json 的话,我们可以使用 @RestController 来注解,他相当于 @Controller 和
@ResponseBody 这两个的组合。
@Controller
public class HelloController {

  @GetMapping("/hello")
  public String handle(Model model) {
    model.addAttribute("message", "Hello World!");
    return "index";
  }
}
11 HTTP 请求映射
通常,可以通过二级路由的方法管理控制器类,详见如下例子:
@RestController
@RequestMapping("/persons")
class PersonController {

  @GetMapping("/{id}")
  public Person getPerson(@PathVariable Long id) { /* ... */ }

  @PostMapping
  @ResponseStatus(HttpStatus.CREATED)
  public void add(@RequestBody Person person) { /* ... */ }

}
路径参数中包含如下三种通配符:
?匹配一个字符*匹配零个或多个路径中的字符**匹配零个或多个路径
@GetMapping("/owners/{ownerId}/pets/{petId}")
public Pet findPet(@PathVariable Long ownerId, @PathVariable Long petId) { /* ... */ }

@GetMapping("/pets/{petId}")
public Pet findPet(@PathVariable("petId") id) { /* ... */ }

@GetMapping("/{name:[a-z-]+}-{version:\\d\\.\\d\\.\\d}{ext:\\.[a-z]+}")
public void handle(@PathVariable String version, @PathVariable String ext) { /* ... */ }

@GetMapping("/pets/{petId}")
// same as
@RequestMapping("/pets/{petId}", method=HttpMethod.GET)
匹配 Content-Type 字段的值,将控制器局限到对应的类型的文件处理
@PostMapping(path = "/pets", consumes = "application/json")
public void addPet(@RequestBody Pet pet) { /* ... */ }

@PostMapping(path = "/pets", consumes = "!text/plain")
public void addPet(@RequestBody Pet pet) { /* ... */ }
返回多媒体类型的流,参考 Accept 请求头
@GetMapping(path = "/pets/{petId}", produces = "application/json")
@ResponseBody
public Pet getPet(@PathVariable String petId) { /* ... */ }
根据请求的添加来部分匹配
@GetMapping(path = "/pets/{petId}", params = "myParam=myValue")
public void findPet(@PathVariable String petId) { /* ... */ }

@GetMapping(path = "/pets", headers = "myHeader=myValue")
public void findPet(@PathVariable String petId) { /* ... */}
还可以通过以下的方式来动态注册请求 URL 到处理方法
@Configuration
public class MyConfig {

  @Autowired
  public void setHandlerMapping(RequestMappingHandlerMapping mapping, UserHandler handler)
    throws NoSuchMethodException {

    RequestMappingInfo info = RequestMappingInfo
      .paths("/user/{id}").methods(RequestMethod.GET).build();

    Method method = UserHandler.class.getMethod("getUser", Long.class);

    mapping.registerMapping(info, handler, method);
  }
}
12 响应函数参数和返回值
Method Handler 包括方法参数和返回值注解。其中请求的方法输入参数包括:
常用注解 @RequestParam, @RequestHeader, @RequestBody 。还包括一些类
javax.servlet.ServletRequest, javax.servlet.ServletResponse, HttpMethod
返回值也支持好多种注解已经类,列表等: @ResponseBody, HttpEntity<B>
矩阵变量
// GET /pets/42;q=11;r=22
@GetMapping("/pets/{petId}")
public void findPet(@PathVariable String petId, @MatrixVariable int q) {
  // petId == 42
  // q == 11
}

// GET /owners/42;q=11/pets/21;q=22
@GetMapping("/owners/{ownerId}/pets/{petId}")
public void findPet(@MatrixVariable(name="q", pathVar="ownerId") int q1,
               @MatrixVariable(name="q", pathVar="petId") int q2) {
  // q1 == 11
  // q2 == 22
}

// GET /pets/42
@GetMapping("/pets/{petId}")
public void findPet(@MatrixVariable(required=false, defaultValue="1") int q) {
  // q == 1
}

// GET /owners/42;q=11;r=12/pets/21;q=22;s=23
@GetMapping("/owners/{ownerId}/pets/{petId}")
public void findPet(@MatrixVariable MultiValueMap<String, String> matrixVars,
               @MatrixVariable(pathVar="petId") MultiValueMap<String, String> petMatrixVars) {
  // matrixVars: ["q" : [11,22], "r" : 12, "s" : 23]
  // petMatrixVars: ["q" : 22, "s" : 23]
}
请求参数
@Controller
@RequestMapping("/pets")
public class EditPetForm {
  @GetMapping
  public String setupForm(@RequestParam("petId") int petId, Model model) {
    Pet pet = this.clinic.loadPet(petId);
    model.addAttribute("pet", pet);
    return "petForm";
  }
}
请求头参数
@GetMapping("/demo")
public void handle(@RequestHeader("Accept-Encoding") String encoding,
              @RequestHeader("Keep-Alive") long keepAlive) {
}
Cookie 值
@GetMapping("/demo")
public void handle(@CookieValue("JSESSIONID") String cookie) {
}
上传文件
@Controller
public class FileUploadController {

  @PostMapping("/form")
  public String handleFormUpload(@RequestParam("name") String name,
                            @RequestParam("file") MultipartFile file) {
    if (!file.isEmpty()) {
      byte[] bytes = file.getBytes();
      // store the bytes somewhere
      return "redirect:uploadSuccess";
    }
    return "redirect:uploadFailure";
  }
}
异常处理
@Controller
public class SimpleController {
  @ExceptionHandler
  public ResponseEntity<String> handle01(IOException ex) { /* ... */ }

  @ExceptionHandler({FileSystemException.class, RemoteException.class})
  public ResponseEntity<String> handle02(IOException ex) { /* ... */ }

  @ExceptionHandler({FileSystemException.class, RemoteException.class})
  public ResponseEntity<String> handle(Exception ex) { /* ... */ }
}
全局控制器异常处理,在 RESTFul API 设计中需要优雅的异常处理方式,Spring 建议
可以通过 @ExceptionHandler 和 ResponseEntity 来将返回消息方法返回体中,并
在 @ControllerAdvice 中集中处理。在定义异常实体类时,可以继承
ResponseEntityExceptionHandler 类。
// Target all Controllers annotated with @RestController
@ControllerAdvice(annotations = RestController.class)
public class ExampleAdvice1 {}

// Target all Controllers within specific packages
@ControllerAdvice("org.example.controllers")
public class ExampleAdvice2 {}

// Target all Controllers assignable to specific classes
@ControllerAdvice(assignableTypes = {ControllerInterface.class, AbstractController.class})
public class ExampleAdvice3 {}
13 跨越 CORS @CrossOrigin
CORS 在 MDN 中有详细的介绍,下面只展示 Spring 中如何配置 CORS。允许单个 URL 和处
理函数跨越可以直接使用 @CrossOrigin 来解决
@RestController
@RequestMapping("/account")
public class AccountController {

  @CrossOrigin
  @GetMapping("/{id}")
  public Account retrieve(@PathVariable Long id) { /* ... */ }

  @DeleteMapping("/{id}")
  public void remove(@PathVariable Long id) { /* ... */ }
}
允许类跨域将注解写类头上
@CrossOrigin(origins = "https://domain2.com", maxAge = 3600)
@RestController
@RequestMapping("/account")
public class AccountController {

  @GetMapping("/{id}")
  public Account retrieve(@PathVariable Long id) { /* ... */ }

  @DeleteMapping("/{id}")
  public void remove(@PathVariable Long id) { /* ... */ }
}
或者混合注解方法
@CrossOrigin(maxAge = 3600)
@RestController
@RequestMapping("/account")
public class AccountController {

  @CrossOrigin("https://domain2.com")
  @GetMapping("/{id}")
  public Account retrieve(@PathVariable Long id) { /* ... */ }

  @DeleteMapping("/{id}")
  public void remove(@PathVariable Long id) { /* ... */ }
}
允许全栈跨域需要实现配置类
@Configuration
@EnableWebMvc
public class WebConfig implements WebMvcConfigurer {

  @Override
  public void addCorsMappings(CorsRegistry registry) {

    registry.addMapping("/api/**")
      .allowedOrigins("https://domain2.com")
      .allowedMethods("PUT", "DELETE")
      .allowedHeaders("header1", "header2", "header3")
      .exposedHeaders("header1", "header2")
      .allowCredentials(true).maxAge(3600);

    // Add more mappings...
  }
}
14 MVC 配置 @EnableWebMvc
14.1 类型转换配置
@Configuration
@EnableWebMvc
public class WebConfig implements WebMvcConfigurer {

  @Override
  public void addFormatters(FormatterRegistry registry) {
    DateTimeFormatterRegistrar registrar = new DateTimeFormatterRegistrar();
    registrar.setUseIsoFormat(true);
    registrar.registerFormatters(registry);
  }
}
14.2 静态资源配置
@Configuration
@EnableWebMvc
public class WebConfig implements WebMvcConfigurer {

  @Override
  public void addResourceHandlers(ResourceHandlerRegistry registry) {
    registry.addResourceHandler("/resources/**")
      .addResourceLocations("/public", "classpath:/static/")
      .setCachePeriod(31556926);
  }
}
15 异步请求
15.1 DeferredResult
@GetMapping("/quotes")
@ResponseBody
public DeferredResult<String> quotes() {
  DeferredResult<String> deferredResult = new DeferredResult<String>();
  // Save the deferredResult somewhere..
  return deferredResult;
}

// From some other thread...
deferredResult.setResult(result);
15.2 Callable
@PostMapping
public Callable<String> processUpload(final MultipartFile file) {

  return new Callable<String>() {
    public String call() throws Exception {
      // ...
      return "someView";
    }
  };
}
16 远端过程调用
Spring 集成了许多常用的远端过程调用的方法,在选取的时候需要根据各自的优缺点来 权衡
- RMI 一般比较快,但是只适合 Java 之间的调用
- HTTP invoker
- Hessian 这是工业界调用比较有名的一种远端过程调用的协议
- JMS (Java Message Service) 具体使用方法参考官方文档 doc
- JMX (Java Management Extensions) 是一个为应用程序植入管理功能的框架。用户可 以在任何 Java 应用程序中使用这些代理和服务实现管理
17 客户端请求 RestTemplate
Spring 提供了两种 Rest 客户端来进行客户端请求, RestTemplate 和 WebClient。在 日常工作中使用 RestTemplate 比较多,具体可查阅集成一节中的详细叙述 endpoints
- RestTemplate 是 Spring 自带的调用客户端,支持自带的模板类和同步的 HTTP 调用
- WebClient 处理异步调用
17.1 初始化
直接使用 Apache HttpComponents 来作为 Spring 的代理来初始化一个 RestTemplate 对象
RestTemplate template = new RestTemplate(new HttpComponentsClientHttpRequestFactory());
新建 RestTemplate 对象,并设置超时为 3 秒
HttpComponentsClientHttpRequestFactory factory = new HttpComponentsClientHttpRequestFactory();
factory.setConnectTimeout(3000);
RestTemplate template = new RestTemplate(factory);
17.2 UriComponents 构造 URI 对象
UriComponentsBuilder 可以新建一个 UriComponents 的实例,示例程序如下
URI uri = UriComponentsBuilder
  .fromUriString("https://example.com/hotels/{hotel}")
  .queryParam("q", "{q}")
  .encode()
  .buildAndExpand("Westin", "123")
  .toUri();

URI uri = UriComponentsBuilder
  .fromUriString("https://example.com/hotels/{hotel}")
  .queryParam("q", "{q}")
  .build("Westin", "123");
17.3 URI 编码
Spring 的 UriComponentsBuilder 自带 encode 方法,方便对 URL 编码
URI uri = UriComponentsBuilder.fromPath("/hotel list/{city}")
  .queryParam("q", "{q}")
  .encode()
  .buildAndExpand("New York", "foo+bar")
  .toUri();
// Result is "/hotel%20list/New%20York?q=foo%2Bbar"

// queryParam 可以处理 query string
URI uri = UriComponentsBuilder.fromPath("/hotel list/{city}")
  .queryParam("q", "{q}")
  .build("New York", "foo+bar");

URI uri = UriComponentsBuilder.fromPath("/hotel list/{city}?q={q}")
  .build("New York", "foo+bar");

// 传递 Map<String, Object> params 对象的 query string
UriComponentsBuilder builder = UriComponentsBuilder.fromHttpUrl(uriTemplate);
params.forEach((k, v) -> { builder.queryParam(k, "{" + k + "}"); });
builder.encode().buildAndExpand(params).toUri(); // 获取到 URI
17.4 URI
restTemplate 支持多种请求模式,例如 GET 请求可以使用下面的方式来出来发送 HTTP 请求来获取数据
// 直接传递参数
String result = restTemplate.getForObject(
    "https://example.com/hotels/{hotel}/bookings/{booking}", String.class, "42", "21");
// 把参数封装在 Map 对象中
Map<String, String> vars = Collections.singletonMap("hotel", "42");
String result = restTemplate.getForObject(
    "https://example.com/hotels/{hotel}/rooms/{hotel}", String.class, vars);
// 自动编码空格
restTemplate.getForObject("https://example.com/hotel list", String.class);
// Results in request to "https://example.com/hotel%20list"
17.5 请求头
使用 exchange() 可以在请求中添加请求头,参考如下示例
String uriTemplate = "https://example.com/hotels/{hotel}";
URI uri = UriComponentsBuilder.fromUriString(uriTemplate).build(42);

RequestEntity<Void> requestEntity = RequestEntity.get(uri)
    .header(("MyRequestHeader", "MyValue")
    .build();

ResponseEntity<String> response = template.exchange(requestEntity, String.class);

String responseHeader = response.getHeaders().getFirst("MyResponseHeader");
String body = response.getBody();
17.6 请求体
直接传递第一个参数作为请求体,在 POST 请求中,输入对象直接被序列化成请求体
URI location = template.postForLocation("https://example.com/people", person);
在 GET 请求中,请求返回的消息体会被反序列化成对应对象
Person person = restTemplate.getForObject("https://example.com/people/{id}", Person.class, 42);
17.7 Jackson JSON
有时候需要修改一下默认请求的序列化方式,例如我们序列化用户是不希望将用户的密 码暴露出来,可以通过下面的方式实现
MappingJacksonValue value = new MappingJacksonValue(new User("eric", "7!jd#h23"));
value.setSerializationView(User.WithoutPasswordView.class);
// 构造请求实体
RequestEntity<MappingJacksonValue> requestEntity =
    RequestEntity.post(new URI("https://example.com/user")).body(value);
// 发送请求,获取回复
ResponseEntity<String> response = template.exchange(requestEntity, String.class);
17.8 Multipart
Spring 还提供了发送多部分请求的方法,使用 MultiValueMap 对象可以构造请求参数
MultiValueMap<String, Object> parts = new LinkedMultiValueMap<>();
// 构造请求的多部分的请求参数
parts.add("fieldPart", "fieldValue");
parts.add("filePart", new FileSystemResource("...logo.png"));
parts.add("jsonPart", new Person("Jason"));
// 构造请求头和添加另外的参数
HttpHeaders headers = new HttpHeaders();
headers.setContentType(MediaType.APPLICATION_XML);
parts.add("xmlPart", new HttpEntity<>(myBean, headers));
一旦多部分的请求参数构造好了,就可以使用如下方法来发送请求
MultiValueMap<String, Object> parts = ...;
template.postForObject("https://example.com/upload", parts, Void.class);
18 发送邮件 Email
在发送邮件前,先准备业务中涉及到邮件的接口,例如定义好订单接口
public interface OrderManager {
  void placeOrder(Order order);
}
通过 Spring 提供的方法发送简单 Email 示例如下
import org.springframework.mail.MailException;
import org.springframework.mail.MailSender;
import org.springframework.mail.SimpleMailMessage;

public class SimpleOrderManager implements OrderManager {

  private MailSender mailSender;
  private SimpleMailMessage templateMessage;

  public void setMailSender(MailSender mailSender) {
    this.mailSender = mailSender;
  }

  public void setTemplateMessage(SimpleMailMessage templateMessage) {
    this.templateMessage = templateMessage;
  }

  public void placeOrder(Order order) {
    // 1. 处理业务逻辑 ...
    // 2. 调用协调模块,处理发送的顺序 ...
    // 3. 复制模板,使用线程安全的模板进入发送队列
    SimpleMailMessage msg = new SimpleMailMessage(this.templateMessage);
    msg.setTo(order.getCustomer().getEmailAddress());
    msg.setText("Dear " + order.getCustomer().getFirstName()
                + order.getCustomer().getLastName()
                + ", thank you for placing order. Your order number is "
                + order.getOrderNumber());
    try{
      this.mailSender.send(msg);
    } catch (MailException ex) {
      // simply log it and go on...
      System.err.println(ex.getMessage());
    }
  }

}
19 执行任务和任务调度
传统的 Spring 中的任务调度通过实现 TaskExecutor 和 TaskScheduler 接口来控
制,为了避免使用 XML 配置。我还可以在使用注解的方式来定义异步任务。要使用任务
需要在配置类中开启异步任务和任务调度,具体如下
@Configuration
@EnableAsync
@EnableScheduling
public class AppConfig {
}
可以使用 @Scheduled 注解来定义周期任务,如下
@Scheduled(fixedDelay=5000)
public void doSomething() {
  // something that should execute periodically
}

@Scheduled(initialDelay=1000, fixedRate=5000)
public void doSomething() {
  // something that should execute periodically
}

@Scheduled(cron="*/5 * * * * MON-FRI")
public void doSomething() {
  // something that should execute on weekdays only
}
可以使用 @Async 注解来定义异步任务
@Async
void doSomething() {
  // this will be executed asynchronously
}

@Async
void doSomething(String s) {
  // this will be executed asynchronously
}

@Async
Future<String> returnSomething(int i) {
  // this will be executed asynchronously
}
@Async 注解的异步任务有时候会发送异常,对于异常处理方式如下
public class MyAsyncUncaughtExceptionHandler implements AsyncUncaughtExceptionHandler {
  @Override
  public void handleUncaughtException(Throwable ex, Method method, Object... params) {
    // 处理异常逻辑
  }
}
20 缓存 Cache
缓存 Cache 使用如下的注解俩定义
@Cacheable标注定义缓存的方法@CacheEvict: 标注删除缓存@CachePut: 标注更新缓存@Caching: 重新组合和定义缓存,一般适用于定义组合式的缓存策略@CacheConfig: 标注在类上,定义类级别共享的缓存
20.1 开启缓存
通过配置类的方式开启缓存
@Configuration
@EnableCaching
public class AppConfig {
}
20.2 @Cacheable
@Cacheable 是用来声明方法是可缓存的。将结果存储到缓存中以便后续使用相同参
数调用时不需执行实际的方法。直接从缓存中取值。最简单的格式需要制定缓存名称。
定义缓存的方法如下
@Cacheable("books")
public Book findBook(ISBN isbn) { /* ... */ }

@Cacheable({"books", "isbns"})
public Book findBook(ISBN isbn) { /* ... */ }

// SpEL
@Cacheable(cacheNames="books", key="#isbn")
public Book findBook(ISBN isbn, boolean checkWarehouse, boolean includeUsed) { /* ... */}
@Cacheable(cacheNames="books", key="#isbn.rawNumber")
public Book findBook(ISBN isbn, boolean checkWarehouse, boolean includeUsed) { /* ... */}
@Cacheable(cacheNames="books", key="T(someType).hash(#isbn)")
public Book findBook(ISBN isbn, boolean checkWarehouse, boolean includeUsed) { /* ... */}
定义同步缓存
@Cacheable(cacheNames="foos", sync=true)
public Foo executeExpensiveOperation(String id) { /* ... */ }
条件缓存
@Cacheable(cacheNames="book", condition="#name.length() < 32")
public Book findBook(String name) { /* ... */ }

@Cacheable(cacheNames="book", condition="#name.length() < 32", unless="#result.hardback")
public Book findBook(String name) { /* ... */ }

@Cacheable(cacheNames="book", condition="#name.length() < 32", unless="#result?.hardback")
public Optional<Book> findBook(String name) { /* ... */ }
20.3 其它注解
@CachePut 也可以声明一个方法支持缓存功能。与 @Cacheable 不同的是使用
@CachePut 标注的方法在执行前不会去检查缓存中是否存在之前执行过的结果,而是
每次都会执行该方法,并将执行结果以键值对的形式存入指定的缓存中
@CachePut(cacheNames="book", key="#isbn")
public Book updateBook(ISBN isbn, BookDescriptor descriptor) { /* ... */}
@CacheEvict 是用来标注在需要清除缓存元素的方法或类上的。当标记在一个类上时
表示其中所有的方法的执行都会触发缓存的清除操作
// allEntries 表示删除所有项目
@CacheEvict(cacheNames="books", allEntries=true)
public void loadBooks(InputStream batch) { /* ... */}
@Caching 注解可以让我们在一个方法或者类上同时指定多个 Spring Cache 相关的
注解。
@Caching(evict = { @CacheEvict("primary"), @CacheEvict(cacheNames="secondary", key="#p0") })
public Book importBooks(String deposit, Date date) { /* ... */}
有时候一个类中可能会有多个缓存操作,而这些缓存操作可能是重复的。这个时候可以
使用 @CacheConfig
@CacheConfig("books")
public class BookRepositoryImpl implements BookRepository {
  @Cacheable
  public Book findBook(ISBN isbn) { /* ... */ }
}